CloudCockpit-Autotask Integration: Setup Guide
Connect CloudCockpit to Your Autotask Instance (Step-by-Step)
Follow these steps to establish a connection between CloudCockpit and your Autotask instance.
This integration is only available for CSPs and Resellers.
Review Related Documentation
Before initiating the connection to your Autotask instance, carefully review all related articles in our knowledge base.
These resources contain vital information about supported and unsupported features, helping you determine if the Autotask integration with CloudCockpit aligns with your requirements.
Multiple Currencies
If you operate with multiple currencies in Autotask, consider the following scenarios:
Separate Instances: If you have Autotask instances in different currencies (for example, one in EUR and another in GBP), it's recommended to create one connection per instance.
Multi-Currency Enabled: If you have a single Autotask instance with Multi-Currency functionality enabled, create one connection for each currency you transact in.
Connection Process
Create Security Level in Autotask
1. Navigate to Admin > Company Settings & Users > Resources/Users > Security Levels.
2. Create a copy from the API User (system) security level.
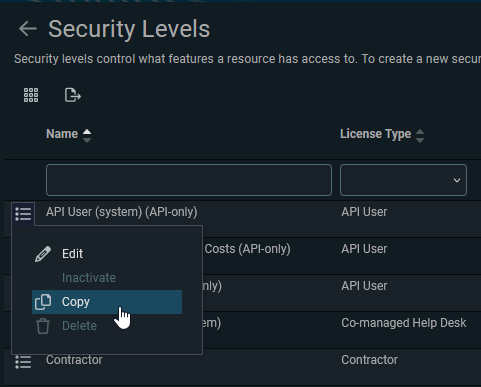
3. Edit the [Copy of] API User (system) (API-only).
4. Set the Name of
the security level to CloudCockpit API User.
Set Security Level permissions
On each section, set permissions as shown below.
1. Contracts
2. CRM
3. Inventory
4. Projects, Service desk, Documents & Knowledge base, Timesheets, Reports
Click on No Permission on these sections.
5. Admin
6. Other
7. Web Services API
8. Save & Close
Go back to top of the screen and conclude the creation of the Security Level by clicking Save & Close.
Create Internal Location
1. Go to Admin > Company Settings & Users > Your Organization > Internal Locations.
2. Click New.
3. Fill the required fields with these values:
- Name: CloudCockpit API Location
- Country: United States
- First Day of Week: Sunday
- Date Format: MM/dd/yyyy
- Time Format: hh:mm a
- Number Format: X,XXX.XX
- Time Zone: (GMT-08:00) Pacific Time (US & Canada)
- Holiday Set: Choose any of your holiday sets
4. Go back to top of the screen and click Save & Close
Create API User on Autotask
Create an API User on Autotask associated to the created security level.
1. Go to Admin > Company Settings & Users > Resources/Users (HR) > Resources/Users.
2. Click New > New API User
3. Fill the required fields with these values:
- First Name: CloudCockpit
- Last Name: Integration
- Email Address: of a person who will be able to take action if an error occurs. This email address will be used for notifications if there are any issues with the integration
- Security Level: CloudCockpit API User
- Primary Internal Location: Select CloudCockpit API Location
4. Generate the Username (Key) and Password (Secret). And copy these credentials for later use.
5. In API Tracking Identifier:
- Integration Vendor: CloudCockpit
6. In Line of Business:
- Resource can view items with no assigned Line of Business: Enable
7. Go back to top of the screen and click Save & Close.
Enable Autotask Connection in CloudCockpit
1. In CloudCockpit, go to Administration > Connectors.
2. Click Add Connection.
3. Choose
an Alias (friendly name) for the connection.
4. Paste the API credentials (Username and Password) previously generated in Autotask.
5. Click Create Connection to integrate with your Autotask environment.
Confirming Operations Success
After setting up the integration, it's important to verify that operations between CloudCockpit and Autotask are functioning correctly.
To confirm the success of Autotask operations in CloudCockpit:
- Navigate to Administration > Audit Logs in CloudCockpit
- Look for operation Create Connector Connection
- Review the status and details of this operation to ensure it has completed successfully
Related Articles
Map CloudCockpit Offers to Autotask
Follow this guide to map your CloudCockpit Offers to Autotask Recurring Services. Integrating CloudCockpit with your Autotask Instance requires mapping each Offer, acquired by your Customers, to the corresponding Autotask Services with matching Terms ...Map CloudCockpit Customers to Autotask
Follow this guide to map CloudCockpit Customers to Autotask Companies. Each organization record in Autotask represents a business entity, such as a Customer, Prospect, Partner, or Vendor. Currently, CloudCockpit only supports the Customer business ...Map existing subscriptions to Autotask
Follow the steps outlined below to map existing CloudCockpit Subscriptions to Autotask Contracts. Important considerations before mapping Ensure that each CloudCockpit Customer is accurately mapped to an Autotask Company. Map CloudCockpit Customers ...Map new subscription to Autotask
How to Map CloudCockpit Subscriptions to Autotask Contracts When you purchase a subscription on CloudCockpit, it can be directly mapped to an Autotask Contract. This ensures that no other steps are needed, saving users from having to visit the ...Resolving Autotask Sync Failures
If automatic sync fails, users should perform a manual sync before performing additional operations on the Subscription. When an operation fails to be automatically synced to Autotask, it will not prevent follow-up operations from happening. Why ...